
Vive l’Empereur! Or not…
 Pevans plays Commands & Colors: Napoleonics
The menu below will take you to specific sections of my review – use "Introduction" to take you to the beginning. It is also available as a PDF document using this link: Commands & Colors: Napoleonics review (1.2 Mb). (You will need Adobe Reader to view this document – use the link to download it if you need it.)
- Introduction
- Game system basics
The basics of the Commands & Colors system - Specifically Napoleonic
The specifics of Napoleonics - Analysis and conclusions
What I think of the game - Winning at Waterloo – a battle of two halves
Pevans fights the battle from both sides
Introduction
Richard Borg’s simple wargame system first appeared in Battle Cry, published by Hasbro (under the Avalon Hill brand) back in 2000. Since then it has been refined and tweaked and used to portray other wars. The latest is the Napoleonic wars in GMT Games’s Commands & Colors: Napoleonics (following the success of their Commands & Colors: Ancients, published in 2006). As the name suggests, this game covers the wars against Napoleonic France in the early 19th century.
I’ve called this a simple wargame system for a reason. Most wargames are detailed simulations of a specific battle or campaign (with a 48-page rulebook). However, Commands & Colors games provide simple rules for a particular war or historical period. The rulebook (24 pages in this case) is complemented by a set of scenarios, each of which recreates one battle – often with some tweaks to represent the specific conditions of the battle. This gives the games huge scope and lots of replay value.
Game system basics
The basics of each Commands & Colors-style game are the same – and those who’ve played one or more of them may want to skip a few paragraphs until I come back to the specifics of Napoleonics. You start with a blank board, divided into sections (left flank, right flank and centre) and overlaid with a hexagonal grid. On to this you place large hexagonal tiles that depict different terrain (hills, rivers, towns etc) to make a map of a particular battlefield.
Military units occupy a space (hex) and consist of several playing pieces (wooden blocks in the Commands & Colors games, plastic models in others). The number of pieces depends on the unit’s strength – particularly how well it can absorb casualties. One piece comes off for each hit and removing the last piece from a unit wins the opposing player a victory banner. Banners can often be gained by seizing objectives as well. The first player to get the required number of banners wins the scenario.
A player’s turn starts with playing a Command card from their hand. Each card allows them to ‘order’ a number of units, either in a particular section of the battlefield or of a specific type. The player chooses the units they wish to order. Then they move any or all of these – according to how that type of unit moves. Once movement is complete, ordered units can attack – in melee (as it’s called in Napoleonics) against adjacent units or ranged combat against units further away if the attacker has the appropriate weapons (muskets, rifles, bows etc). Finally, the player draws a replacement card into their hand and their opponent gets a go.
The constraints of the Command cards neatly (and often frustratingly!) reproduce one of the problems of the battlefield commander: getting his subordinates to do what he wants them to. Clearly, the more cards a player holds, the more likely they are to have the right card to counter an enemy attack and the more options they have each turn. Thus, the opposing sides in a scenario will often hold a different number of cards to represent the relative effectiveness/flexibility of the historical armies.
In time-honoured fashion, the results of combat are decided by rolling dice. The number of dice rolled depends on several factors: the type of unit, its strength, how far away the target is and the terrain the units are in (sitting in a wood usually gives some protection, for example). The effect depends on what symbols you roll on the dice. Each symbol that matches the target unit – or a ‘hits anything’ symbol – removes one piece. Each flag symbol forces the target unit to retreat a hex and there are other effects in different games. In melee, the defending unit then gets a chance to ‘battle back’, rolling the die in its own attack on the attacker – assuming it’s still there.
In essence, the game is quite simple: set up the board for the scenario; add the appropriate units; play cards to manoeuvre your forces to attack enemy units or seize objectives; roll dice to eliminate the opposition; and win when you’ve garnered enough victory banners. However, there’s a lot more to it than that. In particular, scenarios do not necessarily provide equal chances for both players. Hence the usual format is to swap sides after playing the scenario once and try again from the other side. Combining the victory banners from both games gives the overall winner.
Specifically Napoleonic
Okay, let’s get specific about Commands & Colors: Napoleonics. The first thing I noticed about the game was the weight: all those wooden blocks means the box packs quite a heft. The blocks come in three colours: blue for the French forces, red for the British and brown for the Portuguese. As this mix suggests, most of the scenarios are set in the Peninsular War: British and Portuguese versus the French. To go with the blocks are sheets of stickers depicting the different units and the first job is applying the stickers. This takes several hours, so I suggest doing it in front of the TV one evening.
While the blocks take up most of the room inside the box, there is also a good, solid, mounted board, lots of terrain tiles (you’re not likely to run out of anything), dice (which also need stickers attaching), the deck of Command cards and some cardboard markers. Each player also has a small board that’s used when their infantry units go into square. Then there are reference sheets for each player: one showing the characteristics of their national units, the other summarising the effects of terrain and the cards. And, finally, two booklets: the rules and the scenarios.
As you’d expect, the units represent the three main arms of the military. Each comes in a couple of flavours with some specials. Infantry units (small square blocks) can be Line or Light – there are also Grenadiers, several different Guards units, the British have some riflemen and the Portuguese and French have militia units. Cavalry units (medium square blocks) are Light or Heavy – there are also Guards cavalry units and the French have some Cuirassiers. Artillery units (rectangular) are Horse or Foot and the French have some Guard artillery. There are also leaders (rectangular blocks again, standing on end this time).
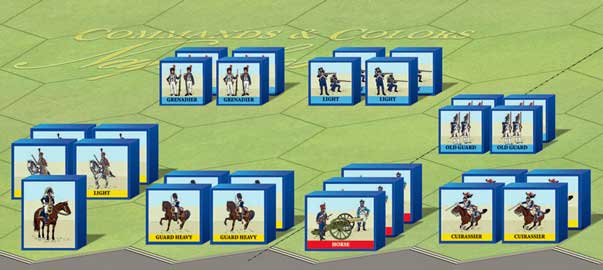 A sample selection of (French) units (from the rules)
Each of these different types of unit has different characteristics in detail, but the three main arms are generally similar. An infantry unit moves slowly, can shoot up to two hexes away and is equally powerful at a distance (though only half strength if they move on the same turn) and in melee (fighting an adjacent unit). A cavalry unit moves quickly and is strong in melee (and can get a second attack if the first succeeds), but has no effect at a distance (the troopers can’t throw their swords!). Artillery moves slowly and shoots up to five hexes, but its effectiveness tails off with distance. Leaders improve the morale of the unit they’re attached to (it can ignore a flag when attacked).
On top of this, there are several rules for reproducing specific tactics of the Napoleonic battlefield. The most obvious is that infantry can ‘form square’ when attacked by cavalry. This formation allows the infantry to hold off the charging horses. In game terms, the unit is given a marker and cannot move or retreat (which makes it more likely to take casualties when attacked). It can only roll one die, at most, in attack, but attacking cavalry are limited to one die too. What’s more, the infantry roll first, so the cavalry may not even get their attack. Once in square, the unit must remain in that formation while cavalry is adjacent. Only when the cavalry moves away can the infantry come out of square (and must be ordered to do so).
This gives players the opportunity to reproduce the classic Napoleonic manoeuvre of forcing infantry into square with cavalry and then firing artillery into the densely packed ranks. As in real life, it’s quite tricky to pull off, as you have to have the right units in just the right places. In the game, a player also loses one Command card for each infantry unit in square. A random card from their hand is put aside (on that board I mentioned) and remains there until the unit is no longer in square.
At first sight, this is a slightly odd rule. Clearly, it reduces the options available to a player with units in square. However, having units in square and unable to move already does this. The rule gives players a disincentive to use square when this was a standard military doctrine of the time. However, the threat of a cavalry attack means players will still have their infantry form square when necessary (though I have to say that in the games I’ve played no more than two units have been in square at any one time). What the rule does is give players a real incentive to get their cavalry in amongst the enemy infantry, rather than hanging back where they can’t be shot at.
The converse of infantry forming square to defend against cavalry is the rule that cavalry units can ‘retire and reform’ when attacked by adjacent infantry. Or run away, as I think of it. If they have a clear line of retreat, the cavalry unit can move back two hexes. The infantry still get a shot at them, but at a reduced effectiveness, and can still ‘take ground’ to occupy the space the cavalry was in. The cavalry avoid the full effect of short-range musket volleys.
The last special rule is ‘combined arms’. This allows an artillery unit to add its dice to the dice of a cavalry or infantry unit that’s making a melee attack. The target has to be a unit the artillery can shoot at, of course. The only advantage I can see to this, compared to making the two attacks separately, is that you’re guaranteed to get all the dice against the target. If you roll two lots of dice, the first might force the target to retreat, putting it out of range of the other attacker. This seems such a small advantage that I’ve not actually used this rule in any of the games I’ve played (though my opponents have).
Analysis and conclusions
Putting all of this together, what have we got? Well, the bulk of any army is infantry and they do the hard work. In order to get a shot at the enemy, the infantry must move forward into range. However, their first shot is only half strength (because they’re moving), while the opposition will shoot back (in their next turn) at full strength. If the defending side has any sort of cover (woods, buildings and so on) that reduces the number of dice the attacker rolls or lets them ignore flags, they are in a good position. The attacker thus needs superior numbers to have a chance of winning – true in every era of warfare!
In melee, the advantage is with the attacker as they roll the dice first. The defender does get to fight back, but only after they’ve taken casualties. Hence the defender’s ‘battle back’ is likely to be less effective. Other things being equal, the attacker should win. It’s likely to be a Pyrrhic victory, though, with the attacker taking casualties on the way. Hence, strategically, a commander needs reserves to advance and exploit a successful attack. So far, so historical. And I note that the British line infantry get an extra die when firing while the French line get an extra die in melee (against infantry). I presume this is to reflect the formations preferred by the two armies: British line versus French column.
There are fewer cavalry units in each army and they don’t have guns. However, they can move from outside musket range straight into melee combat, making them very effective against infantry. This is, of course, countered by the infantry forming square. Which, in turn, has a strategic effect on the game by depriving the defending player of Command cards. Hence, the cavalry are a useful threat (despite the artificial feel of the rule).
The counter move is to put your cavalry where the enemy’s cavalry is, which leads to cavalry fighting cavalry. Whichever side has some cavalry left after this has a definite advantage – I’ve used this to good effect, getting my surviving cavalry round one flank of my opponent’s position and rolling up their infantry.
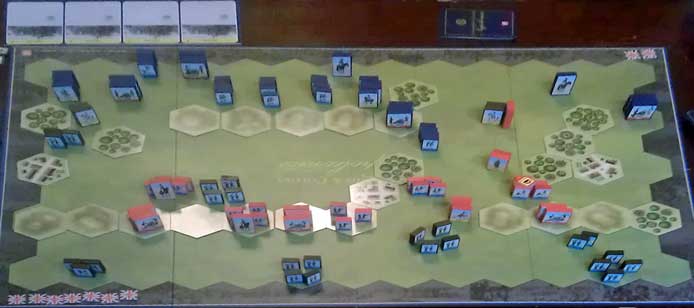
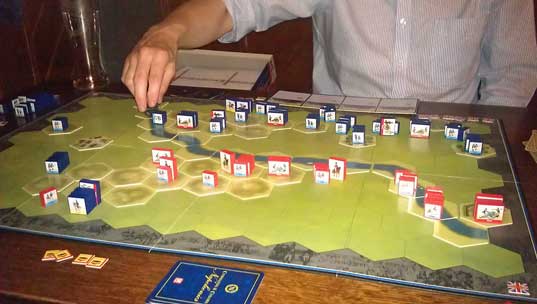 The British (me) about to lose the battle of Talavera – my left flank has disintegrated and French cavalry is roaming around (where’s Sharp when you need him?)
Artillery is useful, but not crucial, whether you’re attacking or defending. At long range it doesn’t have too much effect, but can really annoy your opponent by removing the odd block. It gets more effective the closer the enemy is and charging into the muzzles of the guns is really not a good idea (as I’ve proved a couple of times). In attack, you use the guns to soften up the defenders or force them back, giving your attacking infantry an advantage. In defence, your artillery makes holes in the attacking line as it closes in.
However, the crucial element of Napoleonics, as with the other games using the ‘Commands & Colors’ system, is the Command cards. If you don’t have the cards, there’s nothing you can do. If the enemy is attacking your left flank and you only have right flank and centre cards, you can’t respond. Instead you attack on the right and centre, of course. The key to the game is making the best use of the cards you have. Ideally, you want to manage your hand, building up a set of cards that will let you continue an attack for several turns. With a small hand, your opportunities are limited, but you are likely to be on the defensive anyway.
The other luck element in the game is the dice, of course. There’s not a lot you can do about this – though it’s very useful to be able to blame the dice after losing! It emphasises the importance of good tactics. Pit three units against one and even the best dice won’t save the single unit. Over the course of a game, you should roll enough dice for the results to average out a bit. However, it can be painful when a single die roll is particularly ineffective (if it’s yours) or effective (if it’s the opposition’s).
All in all, I have found Commands & Colors: Napoleonics great fun to play and have got hooked on working my way through the scenarios. Apart from the tactical and strategic challenges of each scenario, you have to manage your cards and cope with the vagaries of the dice. The game repays time spent getting your forces into place and building up the right cards before committing yourself to an attack. However, as the man said, “no plan survives contact with the enemy” and you must also be able to cope with what your opponent does.
As I said at the start of this review, these games are not intended to be detailed simulations of historical battles. What impresses me about Commands & Colors: Napoleonics is that it successfully conveys some of the feel of warfare of the period in a game that is light and fun to play. The 15 scenarios provided with the game give plenty of different challenges, from the skirmishing of Rolica (August 1808) to the pitched battle of Waterloo (June 1815) – okay, part of Waterloo.
My one quibble with the game (and I had the same problem with Commands & Colors: Ancients) is that I have to keep checking the reference sheets to confirm the specifics of the different unit types. Luckily, there aren’t as many different types of units in this game, so it wasn’t as much of a problem.
One thing I do like is the wooden blocks. I expected to find them less realistic than the plastic models of Battle Cry, Memoir ’44 et al. However, the full colour pictures on the blocks are much more attractive than unpainted plastic bits. There’s also a wonderful tactile element to handling the wood. And it’s much easier to pick up and move four blocks than a bunch of Panzer IVs.
Commands & Colors: Napoleonics was designed by Richard Borg and published by GMT Games. It is for two players, aged 13+, and scenarios take 1-2 hours to play. At the time of writing, GMT has sold out of the initial print run, but a second printing is on the way. The first expansion, adding the Spanish army and more scenarios, is already available and more are in the pipeline (the Austrian, Prussian and Russian armies). It gets 8/10 on my highly subjective scale.
My thanks to Games from Pevans (www.pevans.co.uk/Games) for providing the review copy and to my sparring partner, John Mitchell, at the Swiggers games club.
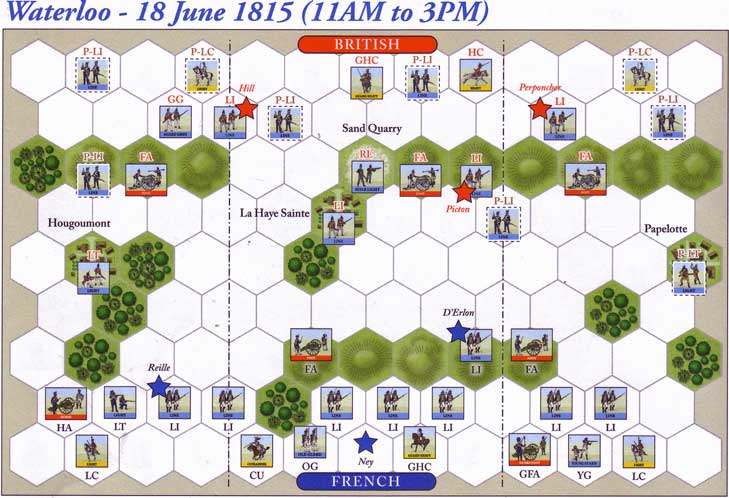 Scenario set-up for Waterloo (from the rules)
Winning at Waterloo – a battle of two halves
The fifteenth and final scenario in Commands & Colors: Napoleonics is the battle of Waterloo. Or at least the early part of it (11 am - 3 pm), well before the arrival of the Prussians. In this scenario, the brown blocks represent Dutch-Belgian troops rather than Portuguese. A lot of the different types of unit are used, including the French Old Guard and Young Guard infantry and Cuirassier cavalry and the British rifles and Grenadier Guards.
The battlefield has the Allied troops set up on and behind a line of hills across the board a third of the way in. A few units are in advance of this line, halfway across the board, holding the buildings of Hougoumont on the British right flank, La Haye Sainte, just right of centre, and Papelotte on the left edge. There is a gap in the hills just to the right of La Haye Sainte. The three building hexes are objectives for the French (worth a victory banner when held by a French unit).
The French forces are almost all in the two rows of hexes along their edge of the board behind the hills in their centre. A few advanced units sit on the hills. The French flanks are on more open ground, broken up with a few woods between them and the Allies. In particular, there’s a column of woods in front of Hougoumont, channelling any advance down the (French) left edge of the board. The valley between the enemy lines on the hills is too wide for musket fire, but narrow enough for artillery duels.
Both players have six Command cards, which is a large hand, and need eight banners for victory. I took the British initially, determined to play defensively and let the French come to me. My regular opponent, John Mitchell, played the French and began by manoeuvring his forces on the flanks, gradually moving forward. I responded by using my foot artillery on the hills to pound the one French line infantry unit exposed on the other hills. This proved far more successful than I expected, destroying the infantry and killing the leader (d’Erlon) with them.
I haven’t mentioned leaders much in my review, as I don’t think they have much effect. They do allow an attached unit to ignore a flag (retreat) when attacked, but this is pretty marginal. However, losing a leader is painful. Any time the unit they’re with takes casualties, you also roll dice to kill the leader. It’s a 1/36 chance – or 1/6 when a unit is destroyed. The odds are low that a leader will be killed, but the opposition gets a victory banner if this happens – essentially pure chance. In this case, the difference was between getting one banner out of the 8 required, which is neither here nor there, and 2 out of 8, which is significant.
The first French attack was down their left flank towards Hougoumont. Light infantry worked their way through the woods with support from horse artillery. The outnumbered light infantry in Hougoumont was quickly forced out and the French light infantry took it (and gained a banner). However, this put them right under the British guns on the hills behind and in range of the Dutch-Belgian line infantry alongside the artillery. It didn’t take long to push them back out of Hougoumont.
On the opposite flank, there was some skirmishing between the Dutch-Belgian light infantry in Papelotte and advancing French line infantry. The French were halted when Dutch-Belgian line infantry and light cavalry moved up in support.
Meanwhile, the French infantry was massing for an attack in the left-centre, aiming for the gap in the hills between La Haye Sainte and Hougoumont. Line infantry advanced, supported by the Old Guard and covered by the artillery on the end of the hills. Allied line infantry met them, backed up by the Grenadier Guards. The British tried to use their superior musketry, but the French charged home to take advantage of their better melee strength.
The Old Guard punched a hole through the British line only to meet the Grenadier Guards. But then the Grenadier Guards weren’t there any more! (The effect of a lucky roll of the dice.) However, this was about the only French success as damaged Allied infantry units retired, leaving room for the British heavy and guard cavalry to charge through and trounce the French cavalry lurking behind their infantry. This sealed victory for the Allied forces by a surprisingly big margin, 8:2.
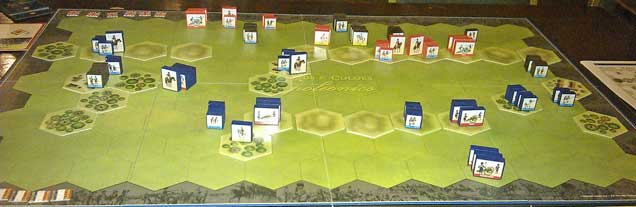
The end of the battle, first time round: the French attack on the mid-right has failed and a counter-attack by Allied cavalry has punched through the French line.
Swapping sides, it’s always surprising how different the battlefield looks from the opposite perspective. It’s clear that the French need several turns and the right cards to get their troops into a decent position to attack. As I started with several right flank cards, I pushed two line infantry units towards Papelotte with some light cavalry following them. Musket fire drove out the defending light infantry and the cavalry chased them back across the hills and finished them off (with some lucky dice rolls) while the French infantry occupied the buildings (to gain a banner).
Defending the British left flank, the Dutch-Belgian light cavalry took on its French counterpart and was defeated. But I’d left the French cavalry in front of the artillery again and they’re gone too. By now my hand had a couple of decent centre cards and some tactics cards that let me order several units. So I used these to mount a proper attack in the centre, marching line infantry over the hills and slanting left towards La Haye Sainte. The Old Guard followed to drive the attack home.
The French infantry attacked quickly (the very useful “Bayonet charge” card) to negate the British advantage with musketry. This worked well, with the line infantry taking La Haye Sainte and pushing back the dangerous British rifles without the Old Guard getting involved. It did leave them a bit exposed to the British guns, though.
I now had several left flank cards and used these to shift the French attack further left, into the gap between La Haye Sainte and Hougoumont, and bring up the cavalry. The British counter-attacked with infantry, including the Grenadier Guards, who were again eliminated in short order. Both sides moved up cavalry units to try to blunt their opponent’s infantry by putting them into square. The cavalry fight that ensued was a Pyrrhic victory for the French horsemen over the opposing light cavalry. What was left retired rather than fall to the muskets.
On the French right, the British attacked towards Papelotte (John had left flank cards, but had run out of right flank ones), only to be beaten off by the French infantry. Continuing to attack on their left, the French infantry pushed the British guns off the hills behind Hougoumont. This gave them freedom to manoeuvre and mop up what was left of the British right flank before attacking Hougoumont from the rear. Though Hougoumont was still in British hands as the game ended with a French victory, 8:6.
An uncharacteristic double victory for me, but evidence that this scenario can certainly be won by either side. Now try it for yourself!
Last of the second battle: this time the French have won on what is now the left, having taken La Haye Sainte (centre). Dutch-Belgian troops hold Hougoumont, but are surrounded.